Alright, athletes — welcome back to the fourth installment of our ACL rehabilitation timeline series.
If you’ve been following along with the series so far, we’ve covered the goals, expectations, and progress typically seen throughout prehabilitation and the first and second months of your rehab post-surgery. And if you didn’t already guess, this month’s post will review what you can expect during that third month of ACL rehabilitation.
So without further ado, let’s dive in.
Physiological Healing in Month Three
As was mentioned in the previous installment, your ACL graft is particularly vulnerable during these first few months of rehabilitation, since the graft is still focused on cellular growth to adapt to the bone and tendon.
But, because you’re progressing further into your rehab, that cellular growth is transitioning from adaptation to a stronger connection to the knee joint — and your third month is where you finally start to feel the effects of those physiological improvements.
Graft Healing
By this point, your graft is finally capable of developing strength, meaning it can start withstanding higher loading forces without as much risk of injury (hooray!).
You can also breathe a sigh of relief, because by this month, the risk of infection or rejection of the tissue is significantly diminished. Any surgery comes with an inherent, small risk of infection, but your ACL is typically only at high risk during those first few weeks after surgery. By this point, the likelihood of infection within the knee is minimal to none.
Pain and Swelling
lus… (drumroll please)… you should finally have zero pain or swelling at the knee!
That being said, if you do still have some pain or swelling, it’s not irreparable; all it means is that, somewhere in your body, there’s a functional limitation in certain movements that’s causing overuse of a particular tissue.
For instance, if you aren’t able to straighten your leg out completely yet, this causes an increased pressure on your quadriceps muscles and the patellar tendon while you walk. As a result, that’ll lead to pain below your knee cap. Swelling is often caused by similar biomechanical deficiencies, like limited quadriceps strength, quadriceps overuse, poor lower extremity alignment, or limited range of motion.
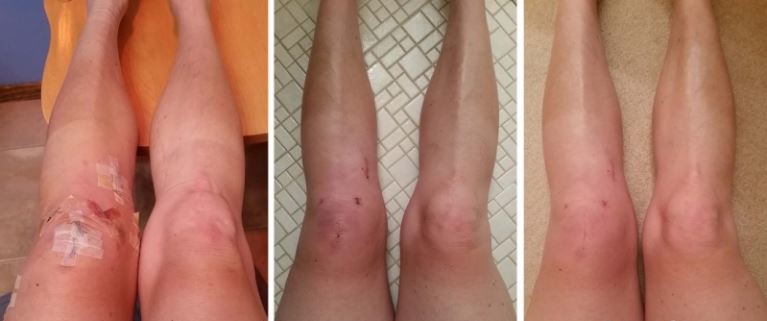
For the most part, though, if you’ve been diligent with your rehabilitation and have continuously checked off the goals for each month, your knee should be free of pain and swelling. And while that’s cause for celebration all on its own, it also means that your knee has recovered enough to transition into the next bit of rehabilitation protocol.
Physical Therapy During Month 3
The past couple of blogs in this series have placed a great deal of emphasis on restoring full knee extension as well as quadriceps activation and strength — and the same applies to month 3, too. (Otherwise all that hard work would go out the window.)
So, let’s take a look at what all that progress has added up to at this point of your recovery (and what else you can expect to take on in addition).
Achieving Full Knee Extension
For years, there has been consistent and extensive research indicating the correlation between decreased knee extension and functional limitation. This is because full knee extension is a crucial aspect for many daily movements, including walking and running gaits, walking up and down the stairs, and maintaining general knee stability throughout. Plus, a lack of full knee extension has been linked to more severe consequences, like arthrofibrosis and poor postoperative outcomes.
During your third month, one of the best ways to further improve your knee extension is through prolonged duration stretching.The key for achieving a proper duration for your stretch is to make sure it lasts for minutes, rather than seconds.
What’s great about this type of stretching is that there are plenty of ways you can go about it. One of our go-to suggestions is shown in the image here; all you need is a chair, a bench or ottoman, a backpack or bag, and a couple of books. It’s as straightforward as it looks: while you’re seated, place your operated leg through the straps of the bag and place your heel on the ottoman. The bag should be packed with a couple of books inside, weighing around 5-10 lbs max. Make sure that one strap of the bag is placed just above the kneecap and the other is placed just below it.
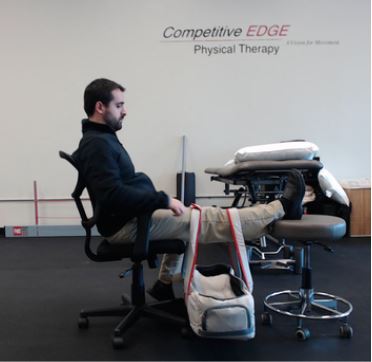
It’s recommended to keep up this passive stretch for at least 10 minutes, as this will allow sufficient time for the tissues around your knee to actually respond to the stretch. You’ll feel a tug on your knee as the weight pulls it into full extension; and the key here is to let your knee relax — that way it’ll continue to gradually move into greater extension through the stretch. (But heads up: even though the stretch is easy, you’ll still probably feel some discomfort at the knee.)
Perform this stretch 2 times a day for no less than 10 minutes each. This will provide the most benefit for refamiliarizing your knee with maximal extension, thus limiting postoperative functional loss and allowing your rehab to progress as planned.
Rebuilding Quadriceps Strength
Similar to knee extension, quadriceps strength is also a major focus for proper ACL healing, and now is the time where you focus on developing true quadriceps strength.
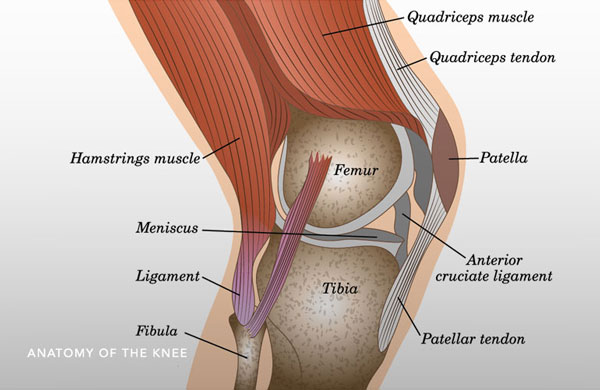
The quads are especially important because they’re the key muscle group that controls vital knee biomechanics, particularly eccentric knee flexion (when your knee bends and lengthens your quadricep muscles under load) and concentric knee extension (when you straighten out your knee and shorten your quadriceps under load). Both of these movements are the primary biomechanics in your knee — and you can bet that they serve as the main movers for some of the most common movements, like jumping, squatting, climbing stairs, and running. For even more context, without your quads, your knee would either hyperextend with every step or buckle completely under your weight.
So, yes: your quadriceps are that important.
From weeks 6-8 of your rehabilitation, quadriceps strengthening will take the front row seat in your training. By week 12, the goal is to have regained 80% of your full quadriceps strength. And that 80% is no arbitrary number — this cutoff is the capacity at which your quadriceps are capable of controlling knee stability and providing adequate shock absorption.
Plus, if you have limited strength in your quads, your body is susceptible to “passive” shock absorption. This means that, rather than your muscles absorbing shock as they should, your bones and ligaments will absorb all the impact instead (which isn’t at all what they’re meant to do). Passive shock warrants considerable attention: numerous studies have demonstrated that passive shock leads to increased development of osteoarthritis after ACL reconstruction.
But enough about the why; let’s discuss how you’re going to strengthen those quadricep muscles.
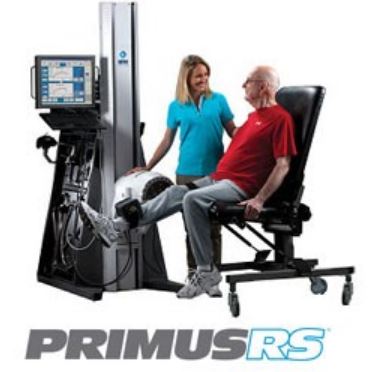
Okay, technically you’ve already been working on the how, but we mean more specifically how you can gauge that 80% strength. There’s really only one, surefire way to determine your muscle strength: isokinetic dynamometry testing.
Unfortunately, this method involves technology as large and expensive as its name is overwhelming, and it’s typically only available at research facilities and hospitals. So even though it provides the most accurate data, it’s definitely not super accessible for most athletes.
But, there are a handful of more common and cost effective methods to estimate quadriceps strength…
Your therapist may get a ballpark assessment of your strength simply through you performing 1 rep of a seated leg press. Of course, this is nowhere near as reliable as dynamometry testing, and the exercise itself doesn’t solely isolate the quad muscle — but it’s enough to provide an objective measurement when you compare your injured leg with the non-injured one.
In a similar vein, they might use the single-leg step-down test. This motion involves both strength and endurance, so it’s ultimately more functional than a true, isolated strength test. It still isn’t as accurate, but it at least allows you to compare your form and reps between either side.
Finally, one of the most common methods for testing quadriceps strength is manual muscle testing, primarily because of its simple execution. Unfortunately, the results can vary greatly, as it’s largely determined by the strength of the person performing the test.
But with all this being said, the main takeaway is that some kind of objective, measurable test of strength should be taken. This will be key for a safe progression in your rehabilitation, and it’ll also be a handy method for you to see how much progress you’ve made over the months.
Rebuilding Gluteus Maximus Strength
If you aren’t already familiar, your gluteal muscles are vital components for a myriad of daily movements — and your gluteus maximus is necessary for stabilizing the pelvis and controlling the rotation and lateral motions of the knee.
Regaining the strength of your gluteus maximus is similar to that of your quadriceps; you want to achieve that 80% cutoff in order for the muscles to sufficiently do their job. And the testing for gluteus maximus strength also parallels the testing for your quadriceps. Using a dynamometer is the most accurate method, but you can also use manual muscle tests, functional movement tests, or tensiometer tests. On a more functional level, observing pelvic and knee control can help determine the strength and utilization of your gluteal muscles.
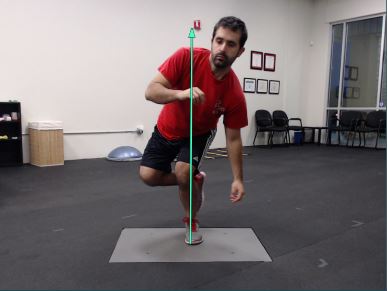
Most of your rehabilitation up until this point will have been more focused on double-leg exercises, like squats, bridges, or leg presses. But starting from around week 10, the focus will shift to more single-leg work, as single-leg control is absolutely crucial at this phase. As you can see in the image here, a lack of proper single-leg control can cause overcompensating in other parts of the body. With more single leg exercise under your belt, your lower extremity will be more prepared for activities like running, jumping, stair climbing, and cutting.
Beginning Proprioception Exercises
But just double- and single-leg control isn’t enough to prepare you for in-game movements — you’ll also have to work on another aspect of knee control: proprioception.
In its most basic definition, proprioception is the body’s ability to respond and adjust to external stimuli. Think about it this way: when you’re in a physical therapy session, you’re usually focused on your exercises in a quiet environment without much distraction or variability. And that’s definitely helpful when you’re learning a new task or movement pattern, but it’s not realistic to the fast-paced reality of in-game movements.
So as you progress through this third month, you’re going to add dynamic variable training to your routine. During your games, you won’t have time to actively think about leveling your pelvis, moving your knee into position, and then aligning your trunk; you just have to take action, and your body needs to be prepared to handle that kind of natural, reactive movement.
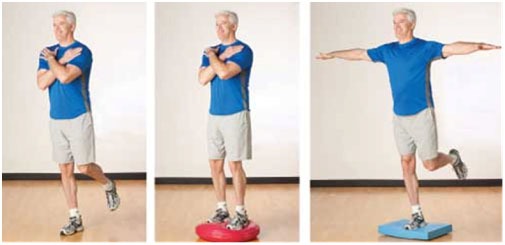
Here’s a handful of common proprioceptive workouts physical therapists often incorporate into ACL rehabilitation:
- Double and single leg stance on a balance board (with and without ball toss)
- Single leg kneeling on a Bosu ball (gluteal focus)
- Double leg squatting on a Bosu ball with external perturbation (someone kicking the Bosu ball to make it wobble and require you to stabilize)
- Single-leg Romanian deadlifts with a kettlebell
This is by no means an exhaustive list, but it’ll at least give you a vague idea of what you can expect going into a new phase of movement learning.
Return to Running Progression
Most athletes are itching to get back to the field, and probably the most common questions after surgery revolves around when you can get back to running.
It’s a totally valid thing to wonder; with all the uncertainty you’ve had to confront throughout the recovery process, it’s natural to want a definitive answer to know when exactly you can look forward to running again.
Unfortunately, specific dates are exactly what you aren’t going to get during rehabilitation.
Some professionals or “standard” protocols will suggest that your third month is when you’re able to get back to running, but there’s no magic number of days that will guarantee a safe return to running for every athlete.
The decision to have an athlete get back to running MUST be based on the athlete’s capabilities. Which makes sense, in the grand scheme of things; if an athlete hasn’t been making significant progress in their strength training, or they aren’t capable of vital biomechanics, it logically wouldn’t be safe for them to jump back into running.
That might be a frustrating revelation, but it’s always better to allow for sufficient recovery time than to take on something and heighten the risk of worsening your injury. And thankfully, there’s plenty of research that can provide us with a solid blueprint for what ensures a safe start to a return to running program. (We’ve got some handy guidelines listed down below, but you can also check out our other blog detailing even more specifics behind a safe return to running.)
Criteria for Safely Returning to Running
This list of criteria is specific to our clinic’s standards. The original author of this blog series uses this set protocol to ensure a thorough rehabilitation before approving his athletes to get back to running:
- Make sure you don’t experience any pain or swelling at the knee (while resting or during activities like squatting or stair climbing).
- Ensure you’re capable of achieving full knee flexion and extension, that way you can be positive you’re maintaining safe and functional biomechanics.
- Achieve a minimum of 80% strength in your quadriceps muscles. (For returning to running specifically, a solid measure of quadriceps strength is the ability to do 15 single leg step-downs without any pain.)
- Achieve a minimum of 80% strength in your gluteus maximus muscles. (Note: If you’ve sustained a “non-contact” ACL tear, both sides of your gluteus maximus may be weak, so comparison isn’t always the best measurement. Functional testing is the most beneficial here, where you observe your pelvic, knee, and trunk control.)
- Be sure that you have sufficient knee extension for a normal walking gait. Look for extension at initial contact and in terminal stance, and make sure you have sufficient loading response in your leg. Additionally, you should be able to walk 3.5-4 miles per hour on a level surface and on a 5-10% incline.
- Make sure you can perform 50 mini hops without pain, both in place and in a back-and-forth pattern over a line of tape.
And there you have it! Following this criteria-based assessment should ensure that you’re ready to finally start that coveted return to running progression the right way.
Additional Considerations for Post-Op Running
Once you’ve met all the necessary criteria and have been officially cleared to run again, now it’s time to develop your running training schedule to ensure the safest transition.
There are hundreds of unique return to running plans, each dependent on injury and rehabilitation. However, The Journal of Orthopedic and Sports Physical Therapy suggests this transition protocol for a safe return to running.

As you work through this transitional training phase, you can keep yourself in check using a handful of cues that can indicate if you’re pacing yourself well enough:
- If you’re able to perform 2 miles of activity without pain, you can move into the next level of your progression plan.
- Perform the program no more than 4 times in 1 week.
- Make sure you don’t perform any workouts back-to-back.
- Avoid progressing more than 2 levels within 1 week.
And as always, pay close attention to any pain, swelling, or difficulty functioning during this phase. These symptoms can serve as an important guide for whether or not the progression plan is gradual enough for your safest return to sport.
Goals for Month 3 of ACL Rehabilitation
After just a couple of months of work, you’ll have already made significant enough progress to achieve some normalized muscle strength and movement. As you continue to work your way through the rehabilitation phases, here’s another big-picture look at what goals you want to achieve through this third month:
- Ensure full knee extension range of motion — use prolonged duration stretching to get your knee over that last bit of extension for its absolute maximum range.
- Quadriceps strength at >80% of the opposite leg — we might sound like a broken record here, but it’s imperative that you hit that minimum percentage of strength to maintain proper knee flexion and extension. Anything less and you won’t be able to safely progress to the next phase of your rehab!
- Gluteus maximus strength >80% — the same goes here; anything under that 80% will prevent you from safely progressing to your next month (and to that return to running program). Make sure your glutes are nice and strong so they can provide sufficient stability for both your pelvis and your knee; remember that comparison isn’t always the best tool here, and use functional assessments.
- Begin proprioception exercises — proprioception exercises will refamiliarize your body with how to naturally respond to external factors (just as it would in-game). As important as it is to know the specific technique for in-clinic PT rehabilitation, you want to be sure your body’s ready to take that knowledge out onto the field!
- Begin return to running progression without pain or swelling — remember that this is a major goal, but not a necessity for this month (nor is it 100% guaranteed). Focus on checking off all the boxes before jumping into the program, then ensure that your knee feels happy and healthy throughout all the new running training.
Bring on Month 4!
Pretty exciting (and extensive) stuff, right?
As you progress into month 4 of your rehab, you’ll start to realize that the work is gradually becoming more demanding — but also, probably more enjoyable. You’ll find yourself finally feeling like an athlete again when you’re prompted to dribble a ball or kick or jump, and this might be the turning point where you start to see the light at the end of the tunnel.
Remember: hope is a powerful force, and it’s well worth harnessing through your recovery journey. Make sure to stick with those positive people in your life and surround yourself with knowledge and support.
And if you’re ready for it, head over to the next installment of our series!

