Welcome to the third installment of our ACL rehabilitation series, where we talk about all things rehabilitation for that second month after reconstruction surgery.
In case you missed it, our previous installment of this series covered the beginnings of ACL rehab from the date of your surgery through the first month of your recovery.
But if you’re further down your road to recovery, read on — this post will detail the various recovery goals and protocol progressions (as well as some important discussion around your mental health, too) specific to this second month of recovery.
Physiological Benchmarks in Month Two
It’s important to remember that, during the first 4-12 weeks after your surgery, your ACL graft is at its weakest point in the recovery process, since the graft requires time to grow and adapt to the bone and tendon. So, be sure to approach your rehabilitative exercises with caution, as the second month is typically when rehab becomes more intense.
But with that in mind, let’s review what you can actually expect at this point in your recovery…
Diminishing Pain
As you progress through this second month, you’ll likely notice a steady decrease in pain. The post-operative pain from the incision and swelling will have mostly subsided, so there’s a good chance that you’re more comfortable while sleeping and may not have to take pain medication as often. At this point, you’ll probably feel the most pain after sitting with a bent knee for a prolonged period of time, or if you’ve undergone excessive loading or prolonged standing.

Be warned, though; with less immediate pain, you might feel more confident in your day-to-day routines, so be extra sure you’re still adhering to your physical therapist’s orders and avoid moving ahead of protocol. This is vital to make sure that you don’t increase the risk of pain or swelling so early on.
Diminishing Swelling
The amount of swelling in your knee will also gradually reduce throughout the initial 3 months after surgery. During the second month, specifically, you’ll probably feel less inclined to ice or elevate your knee. (But it’s recommended to do so after physical therapy, since that’s when you’ll be using your knee more than you would while resting at home.)
Swelling can almost be used as a sort of barometer for the intensity and progression of your exercise. If you notice an increase in warmth or swelling around the knee after a particular workout or activity, you can infer that it probably causes too much strain on your knee at this point in your recovery. Should that be the case, make sure you take it easy on the second day and use lots of ice to have your knee return back to baseline.
On that note, let’s preview what you can expect during your actual physical therapy sessions.
Physical Therapy During Month 2
As you work through these next four weeks, your rehabilitation exercises will begin to shift from refamiliarizing your leg to normalizing your movements. Much of the work will be similar to what you were doing within the first month, but with a little more relief and ease doing it. (But that doesn’t mean there aren’t some new routines tossed into the mix.)
Normalizing Range of Motion
Your physical therapist will be focused on your knee’s ability to bend and straighten; the goal is to achieve near or full range of motion at the joint by the end of week 8.
Oftentimes, physical therapists will use hands-on manual therapy to help relieve tightness in your IT band, around your patella, and within your hamstrings and quadriceps muscles. They’ll also probably work on reducing the development of scar tissue by implementing some scar tissue mobilization.

However, as your therapist is trying to work on improving the movement in your knee, you’re likely going to feel some pain; it can be sharp and catch you off guard (even when you’re expecting it). That being said, your physical therapist is trained to understand exactly how much they need to push your knee in order to achieve normal range of motion. They’ll also provide some home stretching to add to the work done during your physical therapy sessions, so it’ll still be manageable overall.
One thing you may not expect during your second month is the crucial use of the stationary bike. This is because the repetitive motion of cycling is an excellent method for improving the mobility of your knee while also reducing swelling. As you grow more comfortable with the movement, you’ll gradually increase the bike resistance to help further develop your quadriceps muscles. Generally speaking, there’s no real limit to the amount that you can ride the stationary bike; as long as there isn’t any post-workout swelling that limits your daily function, you can practice on your stationary ride for as long as you’d like (per your therapist’s suggestion).
Normalizing Your Walking Gait
As mentioned before, you may be feeling a little more confident with less pain holding you back, and most people feel as though their walking is already completely normal at this point.
Unfortunately, the reality is that 2 months isn’t nearly enough time to perfect your walking gait after knee surgery. Many studies show decreased knee flexion (bending), hip flexion, and shock absorption even a full year after surgery. It’s best to address any potential deviations in your walking gait very early on in the rehabilitation process — partly because you want to avoid excess strain, and partly because deviated walking patterns can quickly turn into habits.
Thankfully, though, there are several common methods that most physical therapists will use to help you achieve that ideal walking gait:
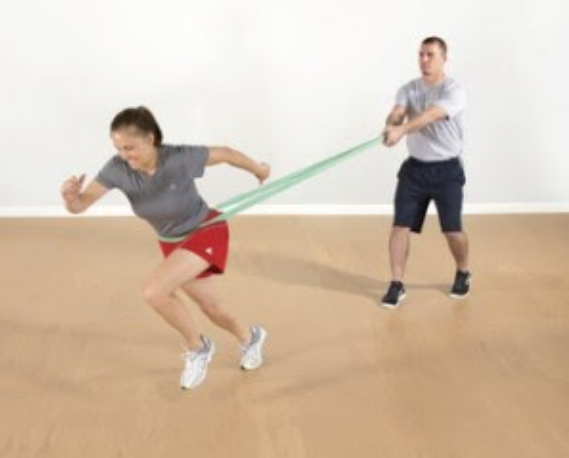
- Practice resisted walking — as you can see from the picture, this technique utilizes a resistance cord or band around your waist while you walk to encourage increased muscular work. Doing this will ensure that you’re using your glutes, quadriceps, and calves to drive your progress forward. Your therapist will provide cues as you practice to make sure your knee points straight ahead and your hips remain level. Regardless of the activity, lower extremity alignment is always paramount for protecting the ACL (and for correcting abnormal mechanics, which is a great bonus).
- Practice terminal knee extension — similar to resisted walking, using a resistance band around the back of your knee ensures that you’re engaging the proper muscles. In this case, the band will help activate the quadriceps muscles to replicate the stance phase of your walking gait. Going through the motions of bending and extending the knee will help your leg learn “loading response,” which is the process that allows your muscles to absorb shock while walking.
- Use a treadmill to practice walking progression — this allows your body to train the repetitions of walking necessary to relearn the habits of a proper gait in a controlled environment. Your therapist might have you use a band around your knees to provide some added resistance (again, helping to give those muscles a boost for activation). As you practice more, you can gradually add to the incline to increase your strength.

By the end of this second month, you’ll be able to walk comfortably without pain for 1 mile (or even more, depending on your progress).
Relearning How to Squat and Climb Stairs
You also get to add a couple new exercises to the rehab routine: squatting and climbing stairs.
Both movements are essential to daily life, so your body needs to be re-accustomed to the motions earlier on in your rehab. Unfortunately, both are often done incorrectly, leading to increased strain on the knee — so it’s doubly important that you know how to practice these movements the correct way.
Lucky for you, we know exactly what that looks like.
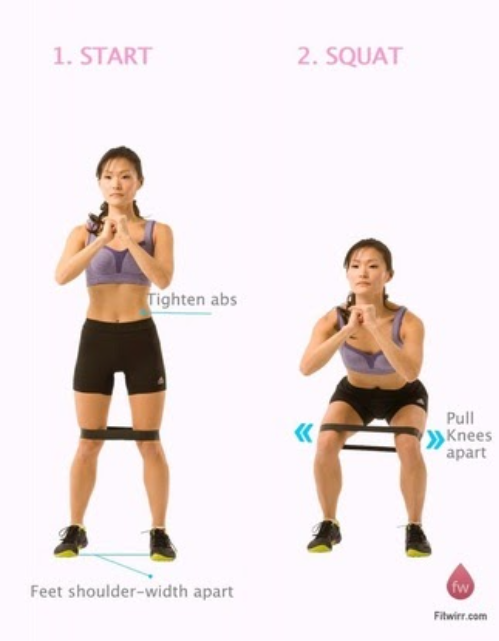
Let’s start with squatting. As you begin to load your knee through weight-bearing squats, it’s definitely not going to be as easy as it used to be, so there are several tips that can help you monitor proper form:
- Practice your squats in a mirror — this will make it easier to monitor your knee and pelvis alignment. It’s imperative to prevent inward collapsing at the knee, as this places increased strain and torque on the ACL graft. (If your ACL injury occurred from a non-contact situation, you might have more difficulty preventing your knee from collapsing.) Additionally, using a mirror will help make sure you aren’t subconsciously shifting your weight away from your surgical leg, which would place undue stress on your uninjured leg. (And we don’t want to be dealing with more than one injury at a time.)
- Use a resistance band around your knees — remind yourself to push your knees out into the band and imagine you’re “separating the floor” with your feet to really benefit from this exercise. If you neglect to push them outwards, a majority of the loading forces will go straight to your knee, rather than at your hips. Keeping these loading forces at your hips is key for activating your gluteus maximus, which is the main muscle that controls your knee alignment.
- Use two separate weight scales, one under each foot — it might sound a bit odd, but hear us out; this technique is great for equalizing the loading pressure on both legs. As mentioned, it’s common for athletes to shift their weight onto their uninjured leg out of fear of loading the injured knee, so the scales provide feedback based on the pressure loading shown side to side. This will help you grow more comfortable with loading your knee, and soon enough, you’ll know how to properly perform a squat without any issue.
- Vary your squatting angles — you can start out by squatting with one foot facing outward (like a surfer would), or you could squat to varying depths. There isn’t one specific recommendation here; the point is that changing up your routine is important to keep your body alert to new techniques for optimal growth. Just make sure you keep those knees pushed out!
Next up is relearning how to climb stairs. It might sound mundane, but it’s vital to know how to properly navigate stairs to save your knees from a great deal of wear and tear. After surgery, most people will try to maneuver going up and down the stairs without using their quadriceps because of how much weaker they’ve become. But if your quads aren’t strong enough, your body winds up compensating for this weakness by placing excess load on your knee joint and calf muscle.
So, just like with the previous workouts, there are several tips that can help establish the proper form for stair climbing:
- Start your stair training one step at a time — if you just try to walk up the stairs, you’ll end up “vaulting” yourself over your stance leg. In other words, you’ll end up pressing yourself up with your uninjured leg to avoid using your surgical leg altogether. You want to avoid using only one leg to get around, so take your time travelling up and down the stairs to ensure you’re still frequently using your surgical side.
- Use a mirror to visualize your positioning — the mirror method comes in handy once again! Using a mirror helps you visualize the position of your knee and torso; for proper stair climbing, it’s important to keep your hip hinged, your torso forward, and your knee behind your toes. As you ascend, drive through your buttocks and hip to propel yourself forward. You’ll want to maintain this same position as you descend the stairs as well (which can feel kind of intimidating to bend forward as you’re walking down, but we promise, it’s totally safe — just take your time with it).
- Keep your pelvis level — when patients try to climb stairs for the first few times, it’s common to try to “reach” for the next step by tilting the pelvis or lifting at the hip. This will ultimately change your pelvic alignment, putting more pressure on the knee and hip. Instead, try to picture a broomstick attached horizontally to the front of your hips. As you climb stairs, try to keep the stick parallel to the floor to keep your pelvis level.
Keeping Your Mental Game Strong
Okay, now that we’ve explained the physical changes in your healing journey, let’s address the mental side of things.
Your second month can be an especially difficult time to manage the highs and lows of rehab. Sometimes, there’ll be days where you can sense the progress you’ve made and start to feel hopeful about achieving athletic normalcy again. But, there’ll also be days where you might feel discouraged by how much weaker your muscles are compared to before, or how much more time you have to dedicate to rehab before getting back out onto the field.

It can be tough to deal with that realization, so it’s important to focus on the positives and find methods to cope with the ups and downs. (The author of this series — who had previously gone through TWO ACL injuries — recommends making a series of smaller, more attainable goals along the way. Work with your physical therapist to find the right goals for you, like changing your diet, getting to the gym to get your workouts in, or listening to motivational speeches from athletes.)
As much as the physical rehabilitation matters, so does your emotional healing. Find something (or multiple things!) that motivates you, and do that every day. Surround yourself with positive friends and family, and maybe even attend a few practices or games to be around the camaraderie of your teammates. Do whatever you need to keep your spirits up and stay motivated; you absolutely got this!
Goals for Month 2 of ACL Rehabilitation
Phew, that was a lot to take in, huh?
If you haven’t noticed by now, that’s going to be a common theme for an in-depth look at the ACL rehabilitation timeline. And while having detailed information can be empowering, an overview can be a great way to stay focused on the big picture. Here’s a bite-sized version of the primary goals you’ll be focused on during the second month:
- Normalizing knee flexion and extension — attaining that full range of motion. Remember, this may be painful or uncomfortable at first, but as the month goes on, your body will start adjusting to the motions again.
- Establishing excellent quadriceps contraction — this is particularly important for resisted walking and stair climbing. Your quadriceps are a key component for offloading much of the strain at your knee joint during these movements.
- Reducing swelling to baseline — make sure to keep up that RICE progression after your physical therapy sessions, as your knee will likely get more aggravated by the therapy workouts. (And don’t forget: pay attention to when your knee starts to swell, as that can be an indicator that your exercises are a little too intense at your current stage.)
- Normalizing your walking gait — practice the aforementioned series of exercises to ensure that you’re using the right muscles and following the correct alignment to alleviate the loading at your knee.
- Ascending and descending stairs — the same applies here; the more you practice correct form, the more your knee will re-adapt to the movement and allow for better biomechanics.
- Continuing to increase muscle strength — keep up that strength training for all those lower extremity muscles. Although month 2 will have a decent emphasis on improving quadricep strength, you can’t forget about those glute, calf, and hamstring muscles.
On To Month 3!
Hitting the second month of your rehabilitation journey is all about looking forward. You’re finally in a place where you can start normalizing certain movements again and relearning how to get around, but not yet at the point where you can do things without a ton of additional training. It can be a frustrating process, and it’s okay to feel down about it at times, but remember — it’s not forever, and it’s not going to keep you down for long.
After all, you already made it to the second month — you can conquer the rest! (And if you’re looking for more information on your upcoming third month, head on over to the next blog here!)


Thank you for writing this. Helpful. Concise.
Great information! Thank you for hosting this site! I left my job (lost insurance) after surgery and have not yet been able to start PT. This is my second ACL surgery in 15 years and, this recovery is easier than the last, which I feel is due to better post surgical pain management (nerve blocks) and quad autograph. Since I have been through this before, I understand the concept of regaining strength and agility, however I really benefited from reviewing the exercises and using a mirror! Also, I appreciate the easy to understand instruction and encouragement you provide. I’ll be back!
We’re glad it helped!
This made me feel better – really getting discouraged by the swelling and discomfort at my month mark starting to doubt all the PT and home exercises are working
We’re glad this helped! Recovery is definitely challenging both mentally and physically, especially when you’re facing a challenging recovery like ACL surgery. It helps to keep the big picture in mind, and know that recovery is not a linear progression — there’s going to be some forward nd backward — but it all comes together in time! Best of luck in your continued rehab, and please let us know if you have any other questions we can answer!
This was really motivating to read. Sometimes you feel like its only you who is doubting your progress and feeling like you might not have the patience to make it through a years rehab. But reading this made me realize its normal and I just need to take it step by step (no pun intended).
On another note- will it be a life long process to keep the knee up to par? In other words to exercise one hour every day?
Or will I someday reach a point where 2-3 days a week are enough.
Will my knee deteriorate if say I stop exercising at 45 years of age?
I am an athlete taking part in sports such as rock-climbing and cross-fit fyi.
Hey Tessa, we’re glad you found the article helpful! ACL rehab is definitely a challenge, but it’s not going to be this intense forever. Once you’ve gone through your initial year, you won’t need to keep up with a full hour of exercise every day. You’ll be able to reach a maintenance level of activity, and you’ll learn to listen to your body and notice when you might need a little extra. Staying in contact with a PT or rehab specialist and having occasional check ins can help a lot with this process.